Tag: 3d modeling

  • Mid-October Update: Blender 3D “Badge Engineering” Project Underway

    Mid-October Update: Blender 3D “Badge Engineering” Project Underway

    This month’s update is vastly more successful and Blender-oriented than the previous few; instead of just engaging in long back-and-forth chat conversations and never really getting anywhere with a model, I’ve finally completed my first small Blender/BeamNG project: adding a missing badge to a vehicle mod.

    A couple weeks ago, while looking for new and interesting real-vehicle mods to try out in BeamNG, I downloaded the 2011-2014 Dodge Charger mod by the popular creators Flanje and NMG. Being a mod from ModLand, I didn’t have high expectations for the quality or accuracy; however, I was somewhat surprised when the vehicle loaded in-game looking pretty close to the actual vehicle. The interior was mostly well-modeled, the exterior was accurate, and there were no glitching parts.

    However, there were a few big problems. First, the sound was completely wrong (which is a totally separate small BeamNG engineering project I completed last week), and second, there were no badges beyond the standard “Charger” and “Dodge” lettering on the trunk. While this wasn’t a huge gameplay issue, it seriously broke the immersion when you loaded in a stock R/T configuration and there wasn’t any R/T badge on the trunk. Why would a modder go to the trouble of modeling most of the other standard badges on the vehicle, but leave out a few random important ones?

    Modeling the R/T badge

    This became the premise for my next big Blender project: “finish the modder’s work” by modeling the other badges, including the R/T badge, the HEMI side badge, and potentially the SXT/SRT8 trunk emblems as well if I had time. I started last Monday (October 5) by pulling down some reference images off of sellers on Ebay, finding straight-on shots of the R/T badge first, since that was my top priority. I actually found a pretty good image without too much digging, which (unfortunately) I’m not sure I can say confidently about the other badges. To ensure that I was going to create a badge sized correctly, I got the actual dimensions of the R/T badge and scaled the image such that the badge in the photo matched those dimensions.

    So I was able to get started pretty quickly in Blender; to begin tracing the badge in the software, I didn’t hunt for custom fonts or try to type out the letters and the slash, because that would be way too imprecise. I found out that the better solution for modeling a badge is to start with a Bezier curve, which allows you to place vertices at key points on the badge and connect them via a curved line. This sounded like a great setup for the R/T badge, so I Ctrl+right-clicked on the corners of the R, slash, and T to get a total of about 27 vertices (81 with the triple baking).
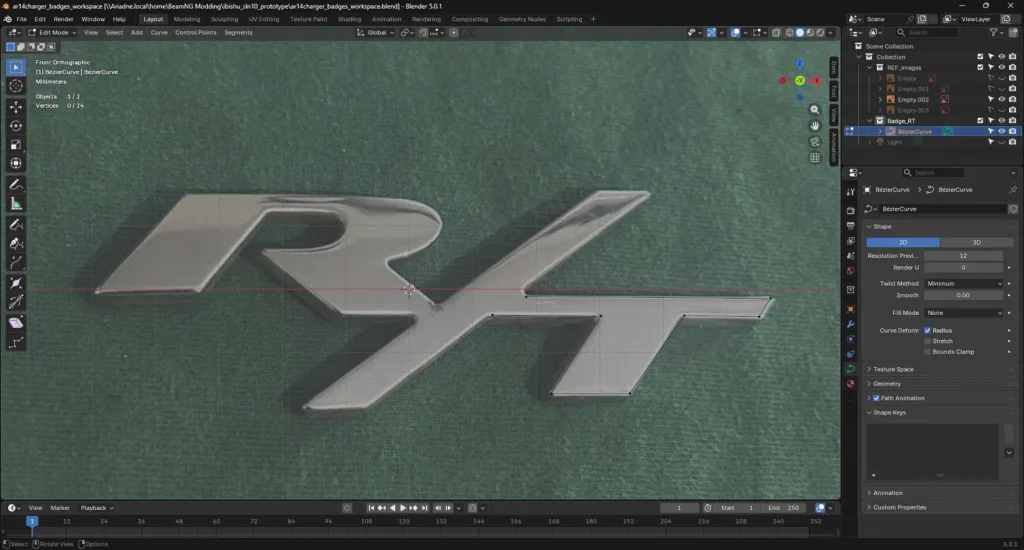
    The early stage of the project, with eight true vertices created around the edges of the “T”. Currently, the badge displayed is the reference image only.

    Once I had vertices in for all of the important corners of the badge, it was time to smooth the points around the bowl of the R, as they were quite jagged to start due to not enough resolution. To do this, I added additional points to the arc around the bowl via a Subdivide operation, moved them onto the lip, and spaced them out equally to ensure that the curve traced the bowl properly. This was the most tedious step of the process, as it required ultra-precise mouse movements and constant tweaking as points gradually got out of line. I spent about a day on this step (likely Tuesday by now) before I got to the smoothed-over version of the R, shown below with the curve in solid form:
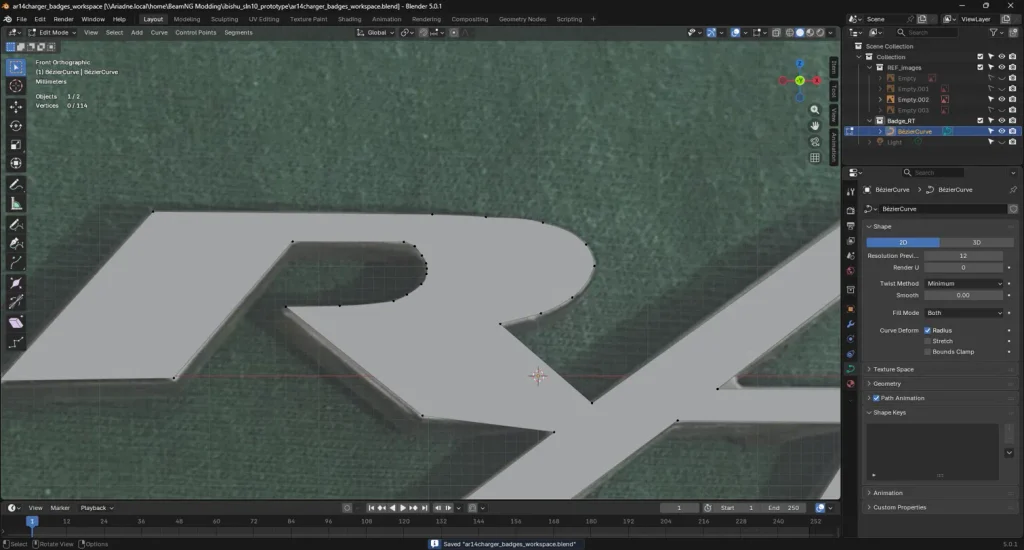
    The completed curve on both the outer and inner portions of the “R”, with the Bezier curve now shown as solid.

    Now that the curve was relatively smoothed-over (with a couple more areas to correct before the next step, which I’m sure you can identify from the above photo), it was time to ditch the reference image and convert the curve to a mesh. I honestly wasn’t expecting much at this point, since I had been working solely with that image and had no real experience seeing what this transformation would look like. However, I was quite surprised when I changed it to a mesh and discovered that the badge actually looked pretty convincing. To ensure that the depth (or thickness) of the badge was correct, I extruded it by 1.5mm, and confirmed that it looked accurate afterwards. The result of this is shown below.
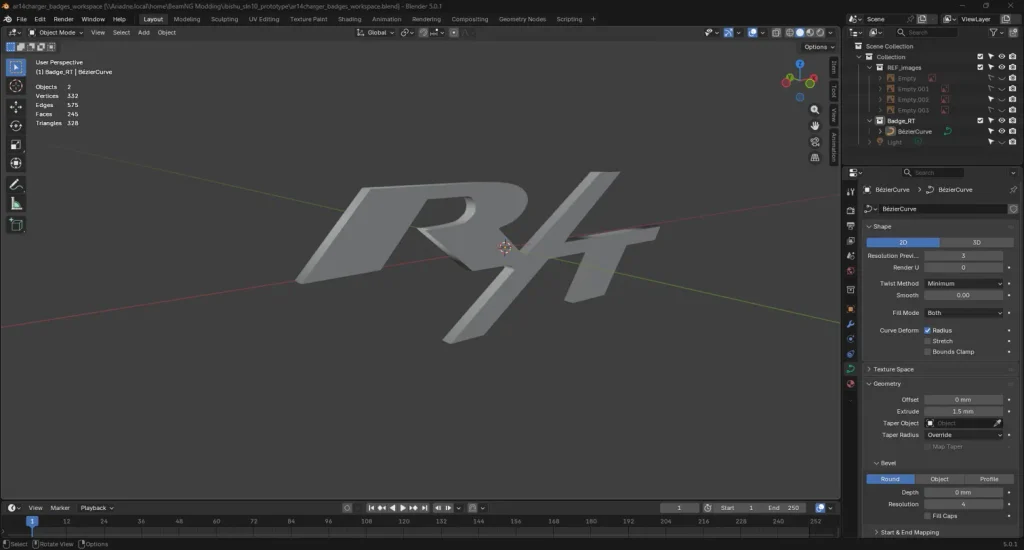
    The meshified and extruded badge, with some minor corrections made around the slash area. Looking pretty accurate; for comparison, see that green reference image at the top.

    After this step, I performed some quick checks on the mesh (Non-Manifold, origin and position verifications), and moved into the UV-mapping/shading phase. The badge should obviously be chrome, but to get to that part, I first had to apply a Shade Smooth by Angle modifier to ensure that the chrome wouldn’t be bent or reflected in odd ways to the jagged edges on the tip of the T, for example. I applied the modifier to 30 degrees to ensure that nothing seemed too subdivided still. I also generated a simple UV map of the badge in Blender, resulting in an interesting-looking diagram of the islands and squares representing the different caps of the badge.

    To actually apply the material, I used the already-existing chrome material provided by the mod, which had been used for the “Charger” left-side badge and the “Dodge” lettering. I simply went to the Materials tab in Blender, added this new material (ensuring that the name matched exactly with what was in the mod’s materials.json file), and turned up the Chrominess setting. Nothing changed in the viewport, of course, since the chrome material would only be rendered in-game, after export. At this point (this was around Thursday/Friday), I was pretty much ready to export the badge. However, I observed an issue with the bowl of the “R” just before doing so: there was still a slight facet on the bowl, making it appear as if it had been creased (shown below).
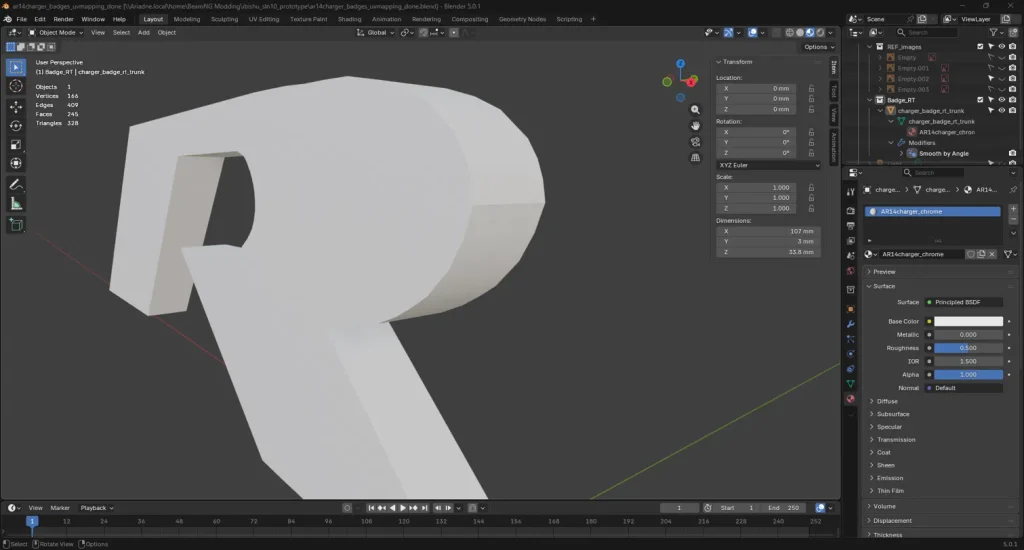
    The slight facet on the bowl of the R–this is what “cause for concern” looks like in case you’re doing something similar. On the right-hand pane, you can see the chrome material has been added.

    While it might not be so noticeable in-game, there was a possibility it could mess up the chrome reflections, as with previous issues. To fix it, I raised the angle on the “Smooth by Angle” modifier to 45 degrees, and the facet disappeared. I also turned on the “Ignore Sharpness” setting, which improved the result even further. With this change completed, I baked (applied) the modifier, hid the reference objects (they’ll have their time later!) and exported as a .dae file for BeamNG.

    Sidenote: If you’re wondering how in hell I got Blender 5.0.1 to export a .dae file, which was supposedly discontinued many major versions ago, here’s the answer. I’m using a custom Blender add-in from the BeamNG modder Grille, which adds the ability to both import and export .cdae/.dae files. This is a vital tool for modern BeamNG modders looking to use the latest Blender versions, since the Blender developers have thrown native .dae support in the trash can and never looked back.

    With the badge exported, there was only one phase left before it could have a chance of appearing on the vehicle in-game: the coding phase.

    Setting up the JBeam files

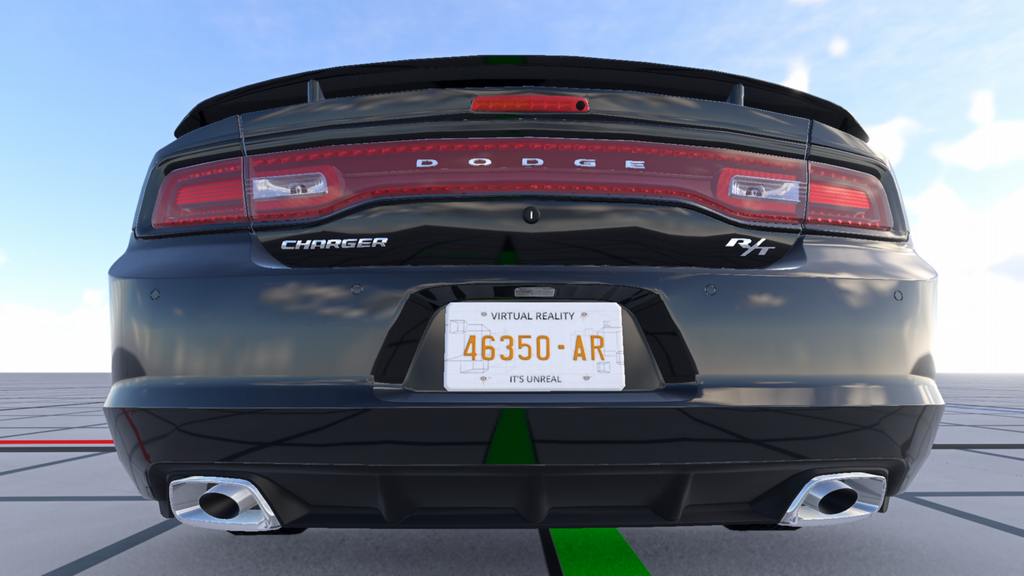
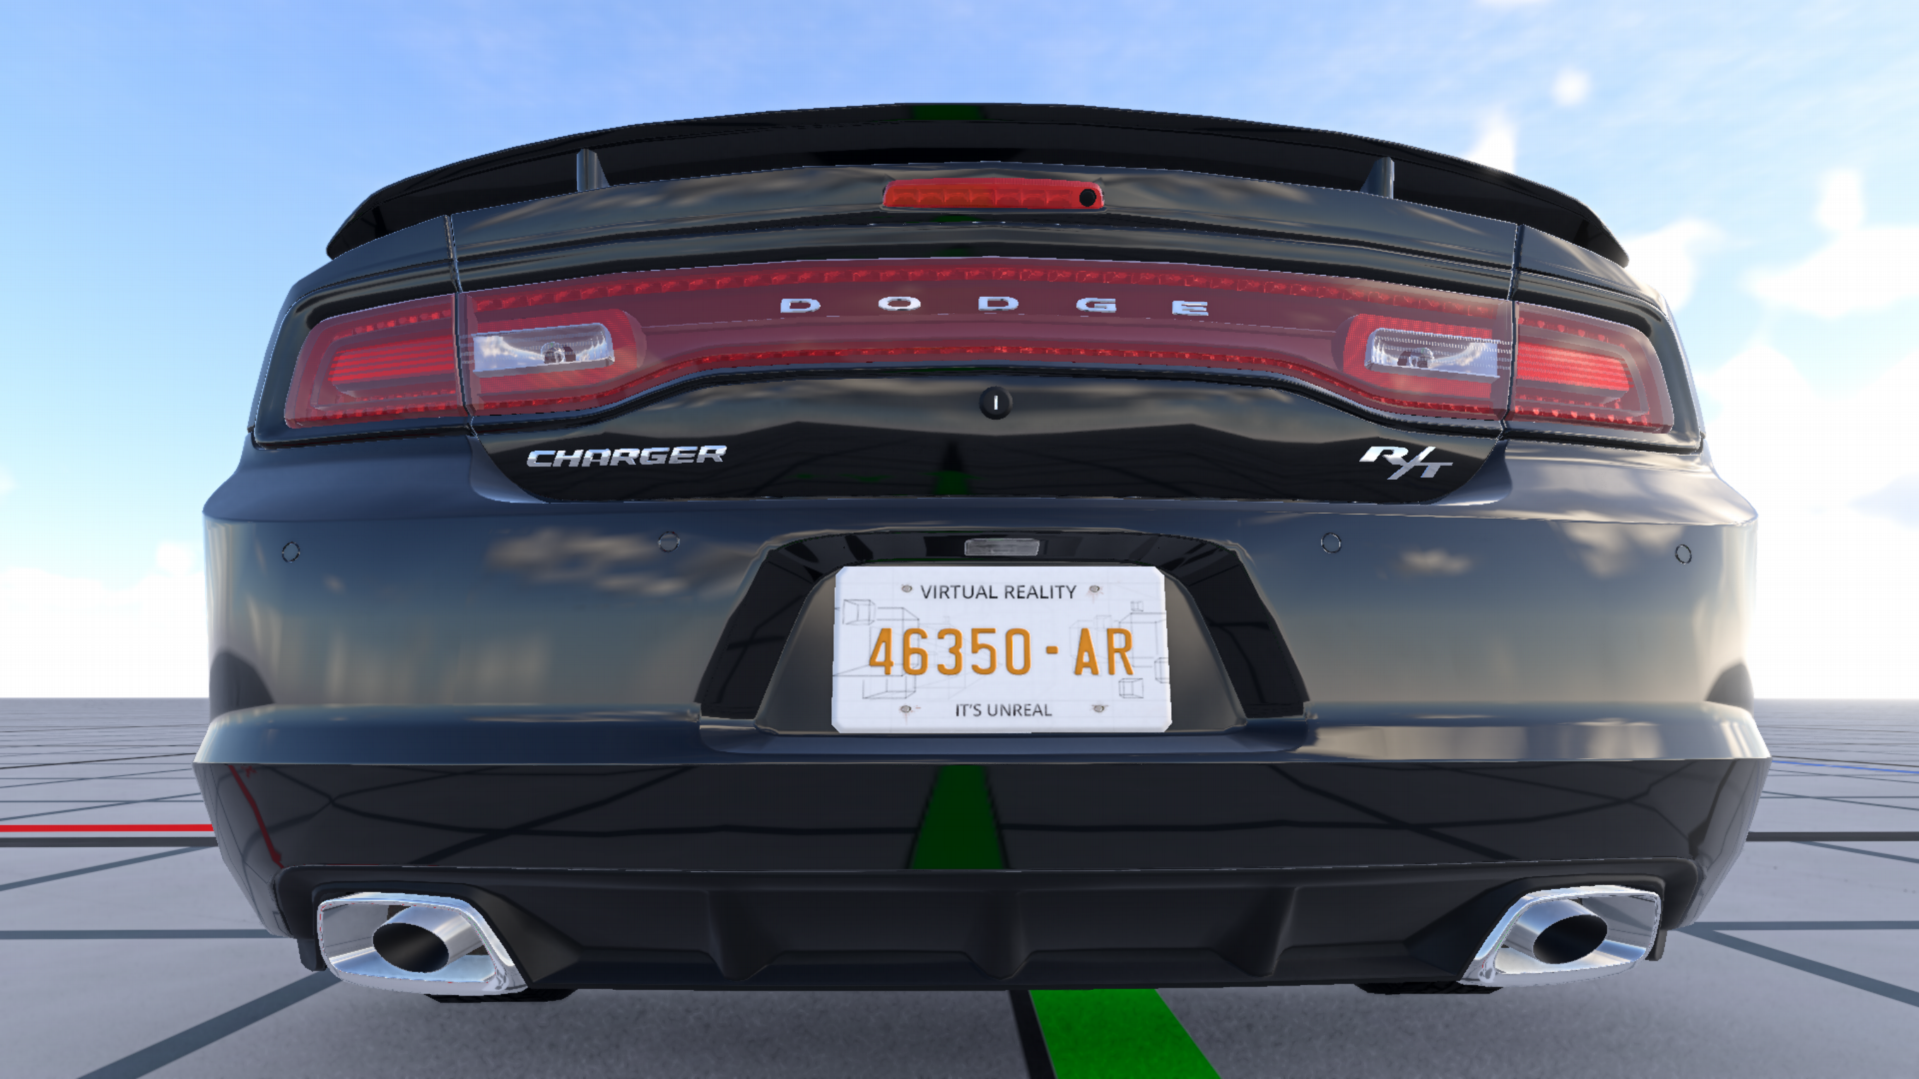
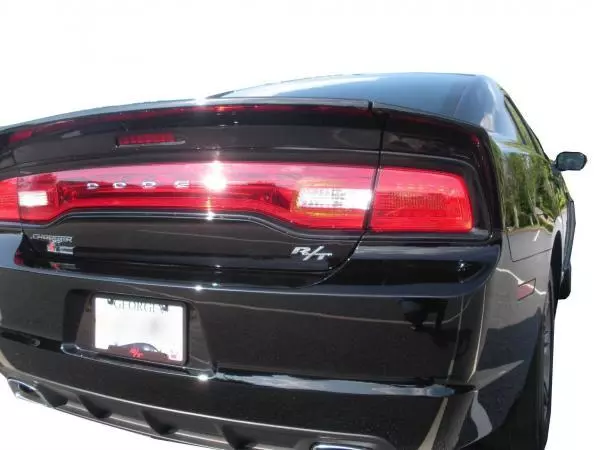
    To ensure that BeamNG recognized the badge’s existence and put it in the right location, I added a simple line to the mod’s Trunk jbeam file, since that’s where the badge ends up going. (See below for a real-world image of the 2011-2014 Charger R/T’s trunk lid).
    This line would add an additional component to the trunk, called “charger_badge_rt_trunk”, map it to the trunk part, and set the pos and rot values for the badge (position and rotation). The line was hardcoded in the flexbodies section of the JBeam file; my future goal is to have the badge set up as a slot in the vehicle configuration menu so you can choose to apply the badge or not. I used some dummy pos numbers at first before loading in the game, just to see how it would load in. Surprisingly, those guesses weren’t far off, but there were a couple of problems.
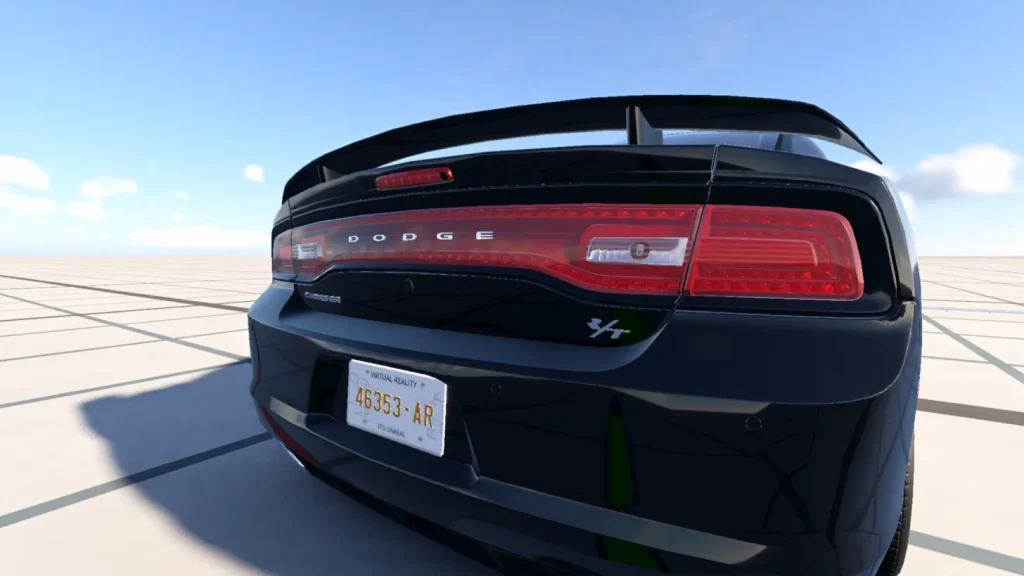
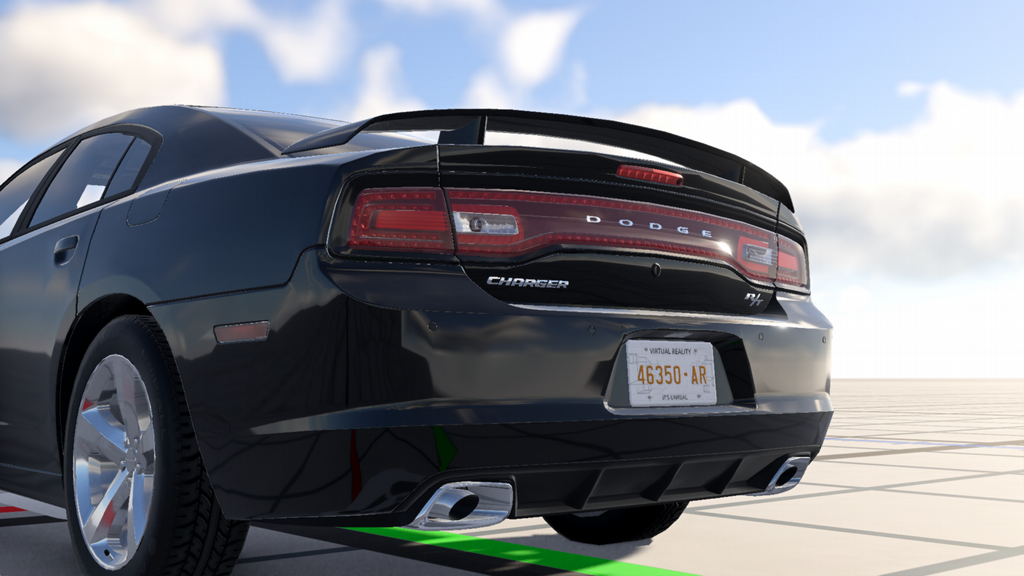
    The R/T badge having been loaded into the vehicle “successfully”. Can you spot the issues? (They’re quite obvious).

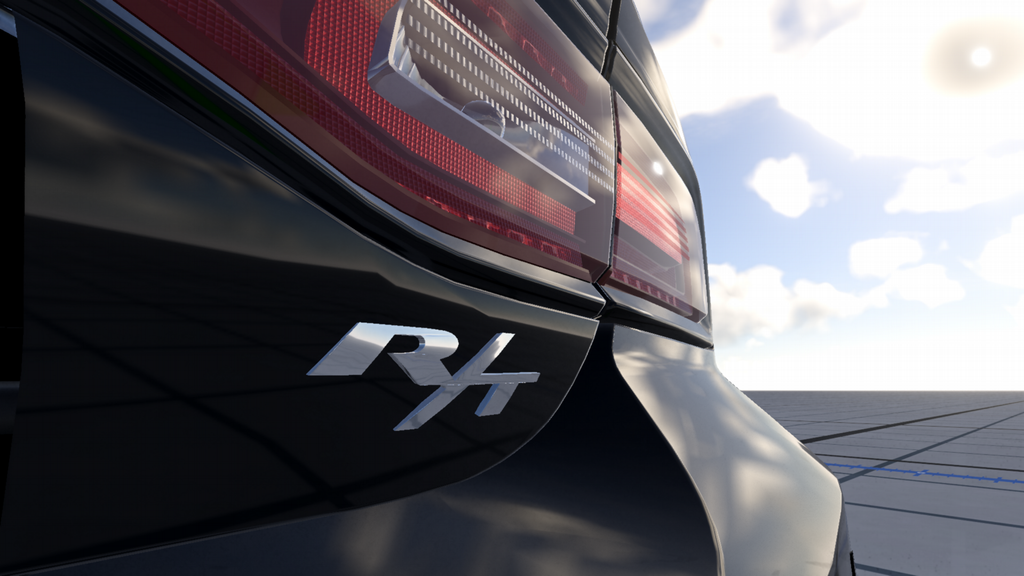
    Well, first of all, the left edge of the R was clipping through the trunk material. Second, the badge was positioned a little bit too low; in the real-world image above, you can see it’s a little bit closer to the bottom edge of the taillight. I thought these were going to be simple position issues–and they technically were–but it took over an hour of constant tweaking and screaming back and forth between Blender and BeamNG to get it to look correctly-positioned. The result of this intermediary screeching is shown below:
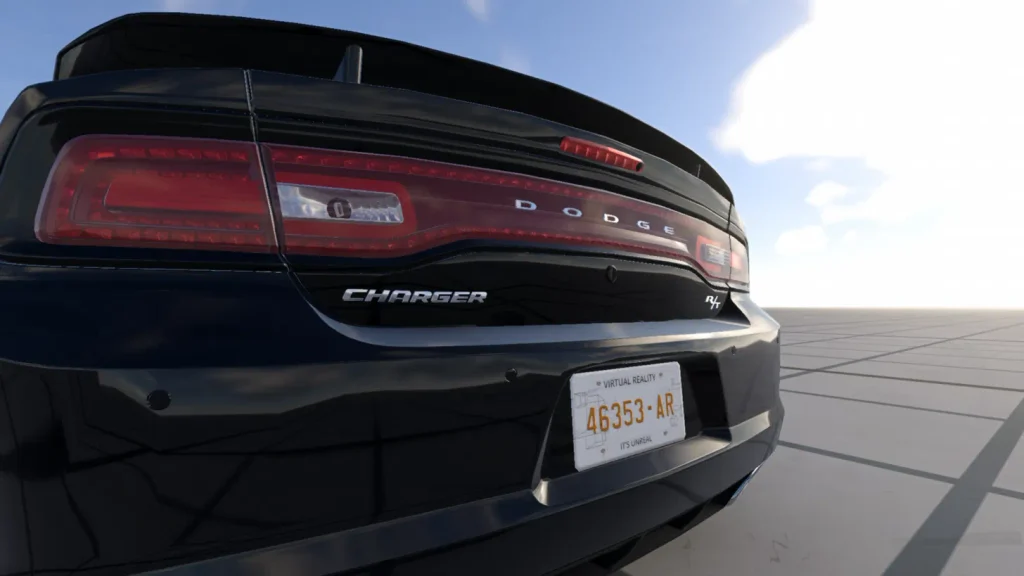
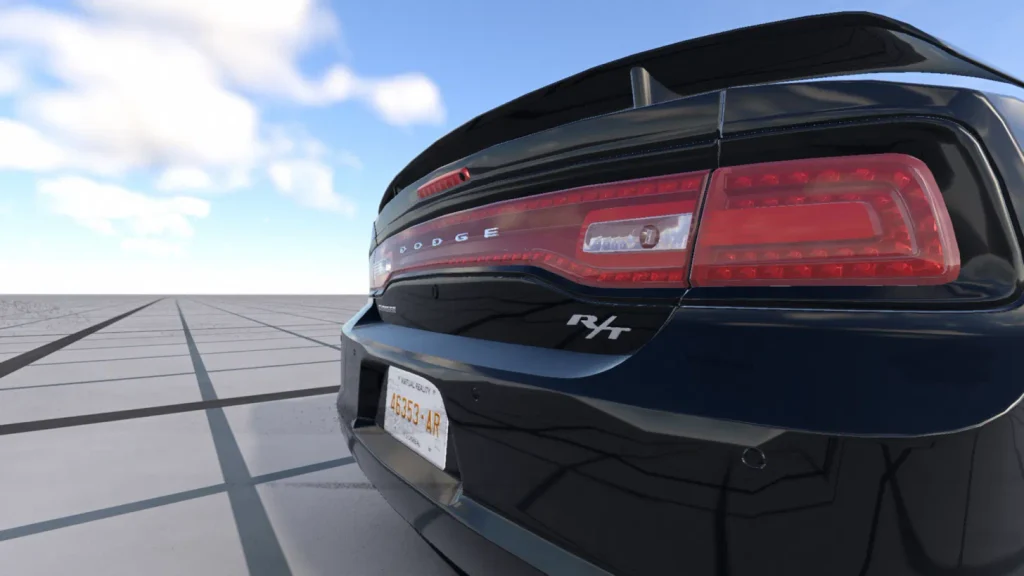
    Now, you might be noticing something about this current badge. While it looks pretty convincing (and probably wouldn’t raise any suspicion when viewed from a greater distance), it also looks a little flat and dull from certain angles. Of course, this is a game, and the reflections can only go so far, but when comparing the appearance of the R/T badge to the Charger badge on the left, there’s a slight difference in the roudedness, or chrominess, of the badge. I noticed this as well after the preliminary tests; to fix this, I ended up applying a 0.5mm bevel/chamfer on the badge via Blender.

    However, I worried this wouldn’t be enough. Even previewing the badge again in Blender, it seemed that it didn’t really change all that much (although the numbers and statistics in the upper-left corner directly confirmed that something had happened). So I went with a different strategy: apply a bend to the badge so that it sticks out in the middle region vertically, and curves outward to match the flow of the trunk lid. I hoped that this would help it capture a bit more of the gloss, as I noticed a similar kind of bending on the Charger badge upon close inspection. I used Blender’s Simple Deform modifier to make this change, doing one on the X-axis and one on the Z-axis. The X-axis curve went to an angle of about 15 degrees, and the Z-axis I kept at 8 degrees, since I noticed some strange streaking/chrome aberrations on the surface due to the competing bends if I went too far above that.

    After re-exporting the badge and loading it into the game, I realized that the change had made a significnat improvement. These photos can’t really do justice here due to their smaller size and WordPress compression, but in-game, they looked quite a bit better than the initial pass.
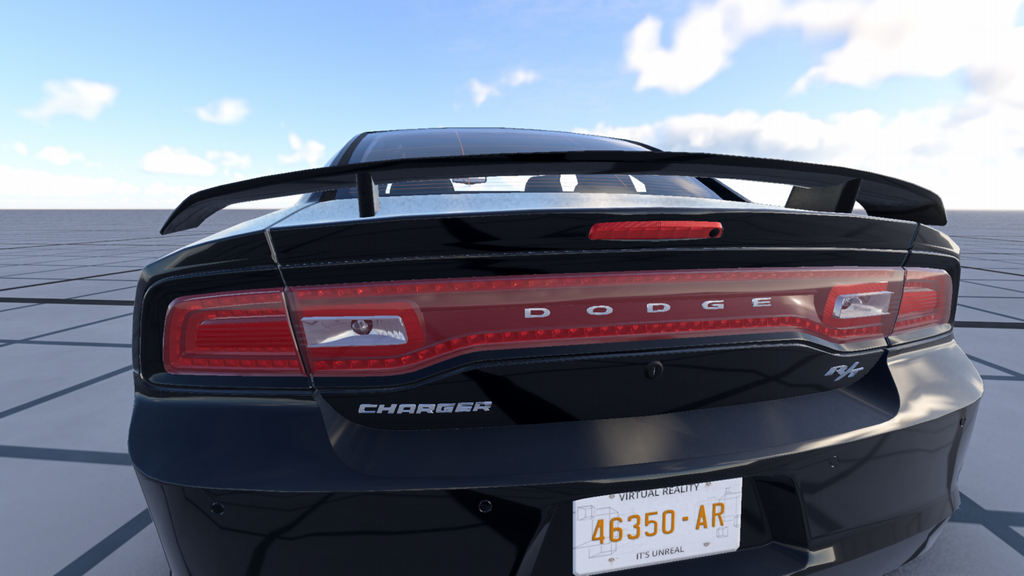
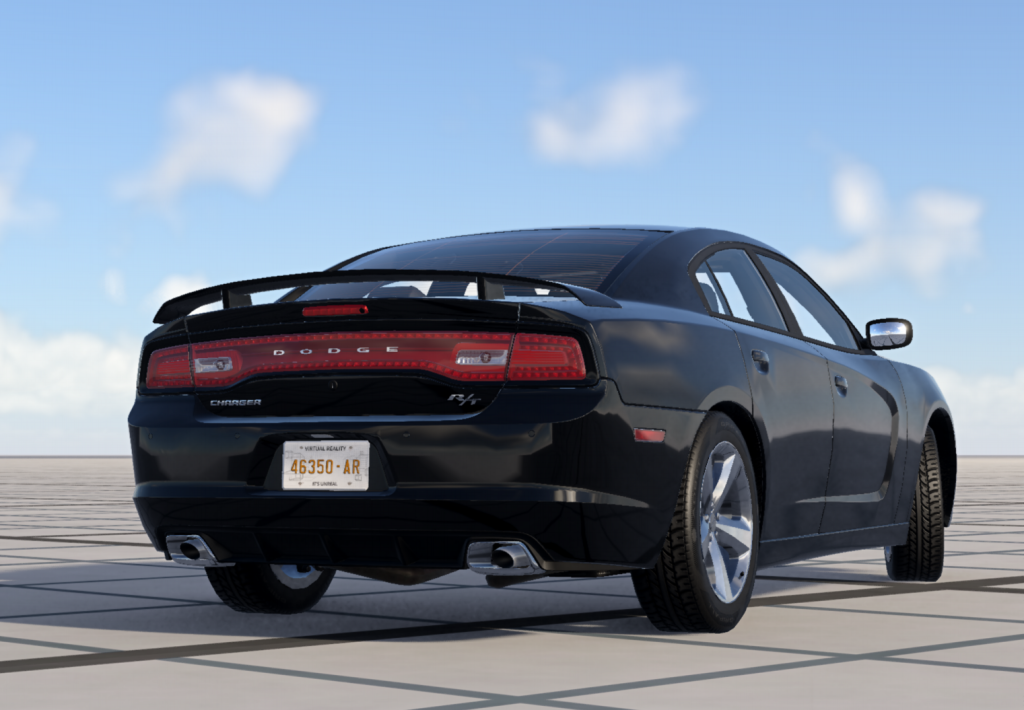
    And with that, I approved the final version of the R/T badge, saved all the changes, and closed out of the first badge-modeling phase. From a distance and close-up, the badge looked more than convincing: the reflection and bevel on the model worked wonders for the chrome appearance. I’ll now be taking some more natural photos in an actual map (not the Gridmap testing area), such as the parking garage in West Coast, USA.

    Next steps

    While the logical next step is to start working on the HEMI side badge, there is an additional thing that I’d like to ideally take care of before I get the HEMI badge into the game. Right now, the R/T badge loads onto the vehicle no matter what configuration you choose; there’s no taking it off since it’s hard-coded into the flexbodies section of the trunk JBeam file. I’d like to find a way to create an additional slot in the Vehicle Configurator, something like “Trunk Trim Lettering”, that allows you to choose between Empty, R/T, SXT (potentially), and SRT8 (potentially). This would be a more coding-heavy undertaking, which can become quite problematic in BeamNG due to the strict syntax requirements, so we’ll see how that goes.

    The reason why I’d like to have that done before the HEMI badge goes on is I don’t want the two badges to start competing and causing conflicts if I have to hardcode both of them onto the vehicle. It would be better to have a slot for the side badge and a slot for the trunk badge, which is the accepted convention for BeamNG mods.

    Well, as this “badge-engineering” project gets further underway, and I start working into the side badge as well, I’ll post more updates and photos on here throughout the process. Hopefully things won’t fall apart once things start getting vastly more complicated–the black edges on that HEMI badge look quite difficult. Stay tuned for more info!
  • Projects Update: A Mystery Image, Bumper 3D Modeling, New Minecraft Ideas

    Projects Update: A Mystery Image, Bumper 3D Modeling, New Minecraft Ideas

    Quite a bit has been accomplished since my last check-in on this site. I’ve kept going on the Blender 3D modeling project of the Toyota Soluna (see the previous blog post for more details), finished Unit 3000 in the New Andaman Beach Villa project (Minecraft), and planning a new complex of forest-located builds on a smaller scale. Among all of this, Flames of Rebellion has cracked 43,000 words, and I predict it’s about halfway to completion now. On top of this, the AoPS Academic Year classes (Algebra 2 in this case) have now started back up. So as you can imagine, things have been a little bit busier than normal!

    I’ve also begun a completely new and unrelated project, which I’ll introduce with a single photo at the end of this post.

    The 3D Modeling Project

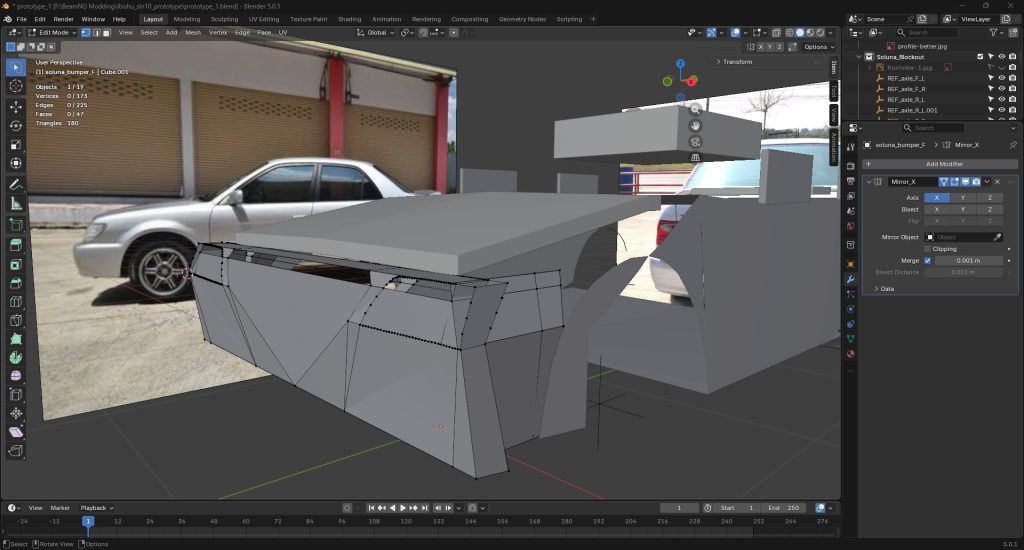
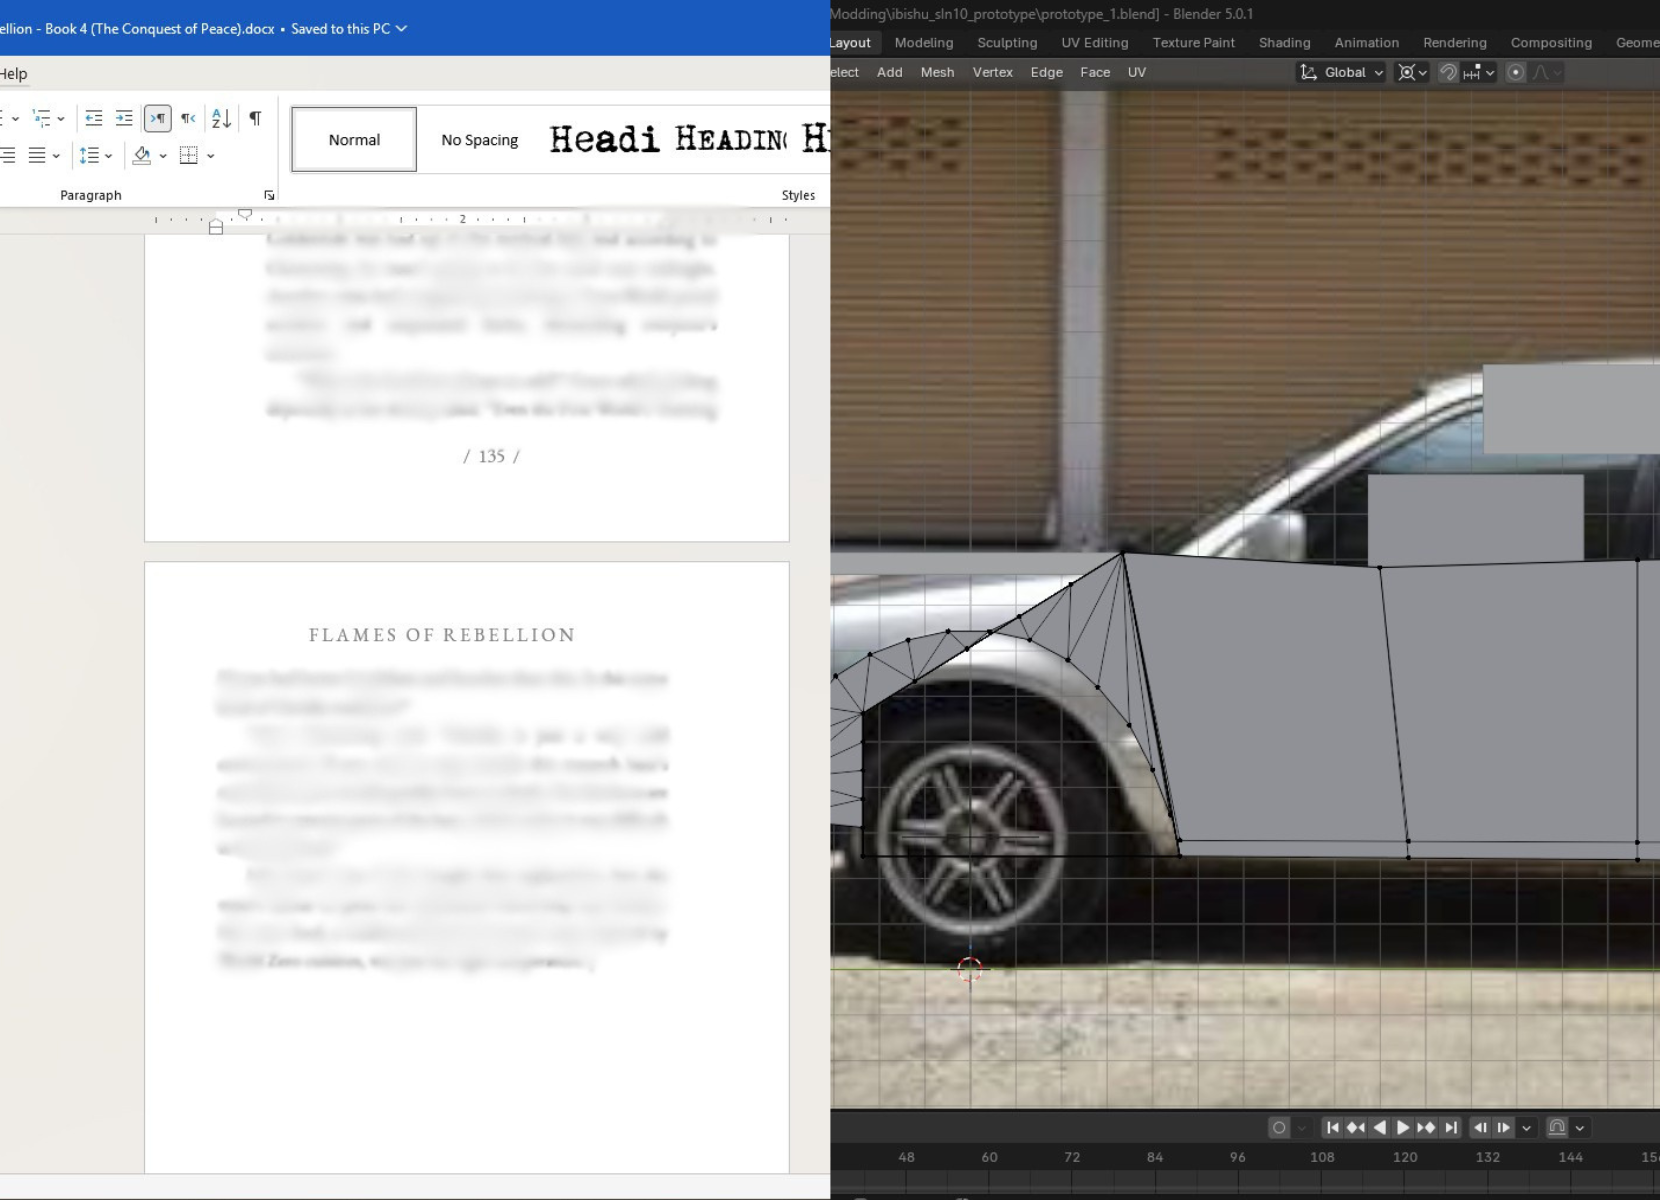
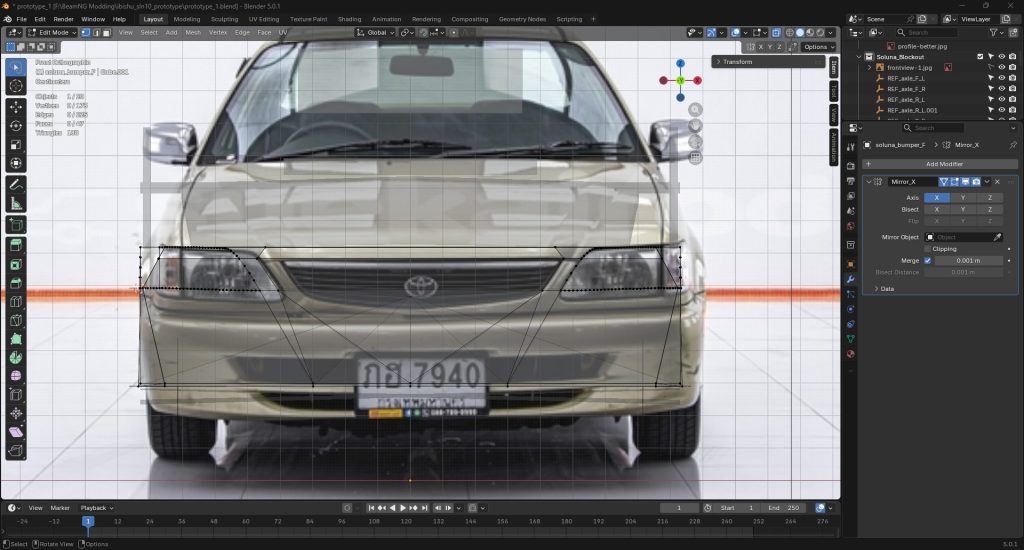
    The front view of the current 3D modeling process, allowing you to see the progress made on the headlight cutout area.

    I’ve taken a brief one-day break from going insane in Blender, but over the course of the past week I’ve made significant progress on the front bumper cutouts for the Soluna. On Tuesday, I finished the headlight cutout (or at least the inner portion), after comparing extensively against the photo and subdividing into hundreds of vertices to get the contour right. The grille cutout is also done, although it seems a little crude and I might have to go back and refine it later. The next step will be the turn signal cutout, which extends to the side and wraps around to the other end of the vehicle in the reference photos. Assuming nothing goes catastrophically wrong (which you never know with this project), it’ll probably be another 2-3 weeks before the bumper is done.

    Given the speed of this project, I’d probably re-calculate my estimate of finishing the 3D model to next spring or next summer. That gives me plenty of time to do the rear bumper, shape the hood and windshield, model the badges, model the openable doors, and actually set a working interior color (unlike some other Mercedes-Benz C250 mods where you can’t change the interior color!). Of course, the JBEAMING, SCREAMING, and UV MAPPING will need to be done after that, so time will need to be factored in for those advanced processes.

    Below is the closer side-view look at the image shown at the beginning of this section, and you can really see all the vertices I’ve added around the headlight cutout to fully shape the area.

    Minecraft Projects and Flames of Rebellion

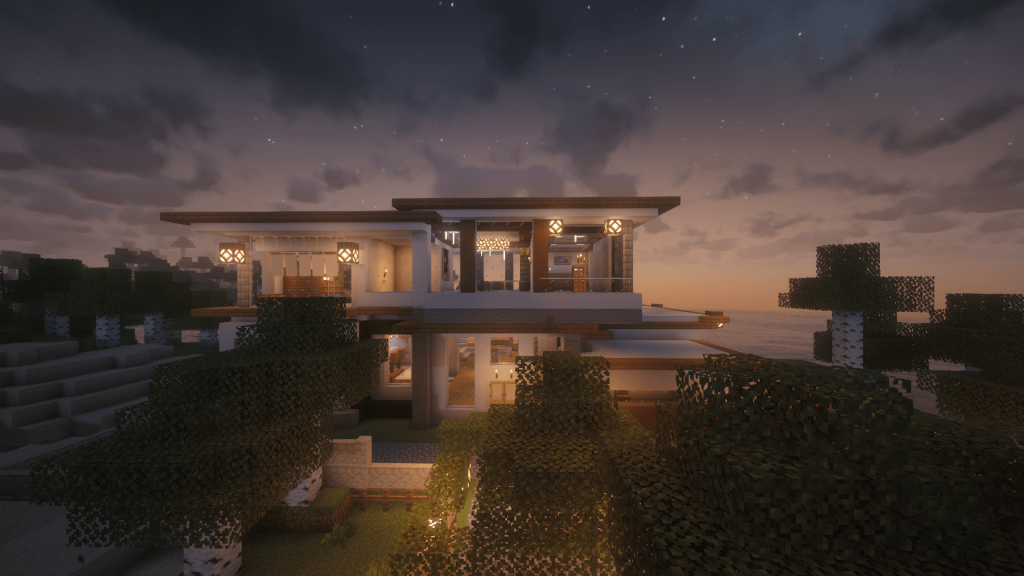
    Front view of the New Andaman Beach Villa #3000 at sunset

    Flames of Rebellion soared to over 43,000 words this week, with more coming every day. This places the book now at 192 pages, which is at about the halfway point considering that this will be another 380-400 page book. I just finished writing a highly intense scene involving Hikotage, who wound up stranded in World Zero after a serious Common Cause attack, and I’m now proceeding to get into some of the most tense parts of the book. I’m still on track for completing the writing portion around November-December 2026, with the publication date to be around January-February 2027 including cover design and proofreading.

    However, I can’t really get a definitive estimate on this, because the proofreading for the previous book consumed quite a bit of time (over 8 months) and caused quite the delay in getting the book out. I’m not sure what’s going to happen this time, but hopefully it won’t be a full eight months.

    On the subject of the Minecraft projects, I recently finished editing the tour video for New Andaman Beach Villa Unit 3000, and started crafting the floor plans for the next series of forest villas. The tour video is now posted on the official Minecraft Builds website, along with the complete photo gallery. I’m considering remastering the tour video for Unit 1000 as well, but this may not actually occur since I’ll be focusing on building the next few forest villas.

    That next project is set to be codenamed the New Andaman Enclave, and will feature much smaller one-story villas when compared to the lush beachfront ones. These will probably come in four to five configurations, both one-bedroom and two-bedroom, and will be nestled in a small complex with plenty of vegetation, right in the middle of the forest. My plan right now is to build four villas per configuration, making a total of around sixteen villas, but this may change depending on the H situation and how much time I have to create these villas. Along with various competing BeamNG scenario projects and calamitous C250 photo-taking sessions, these Minecraft projects may be temporarily pushed to the back burner.

    The Mystery Project

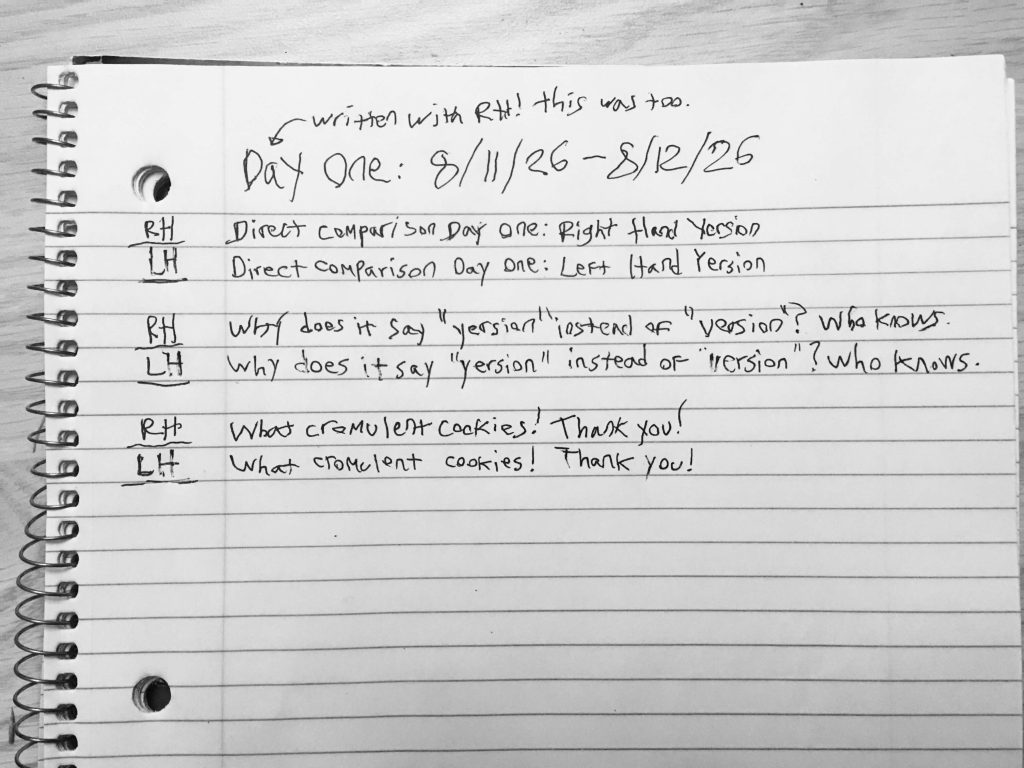
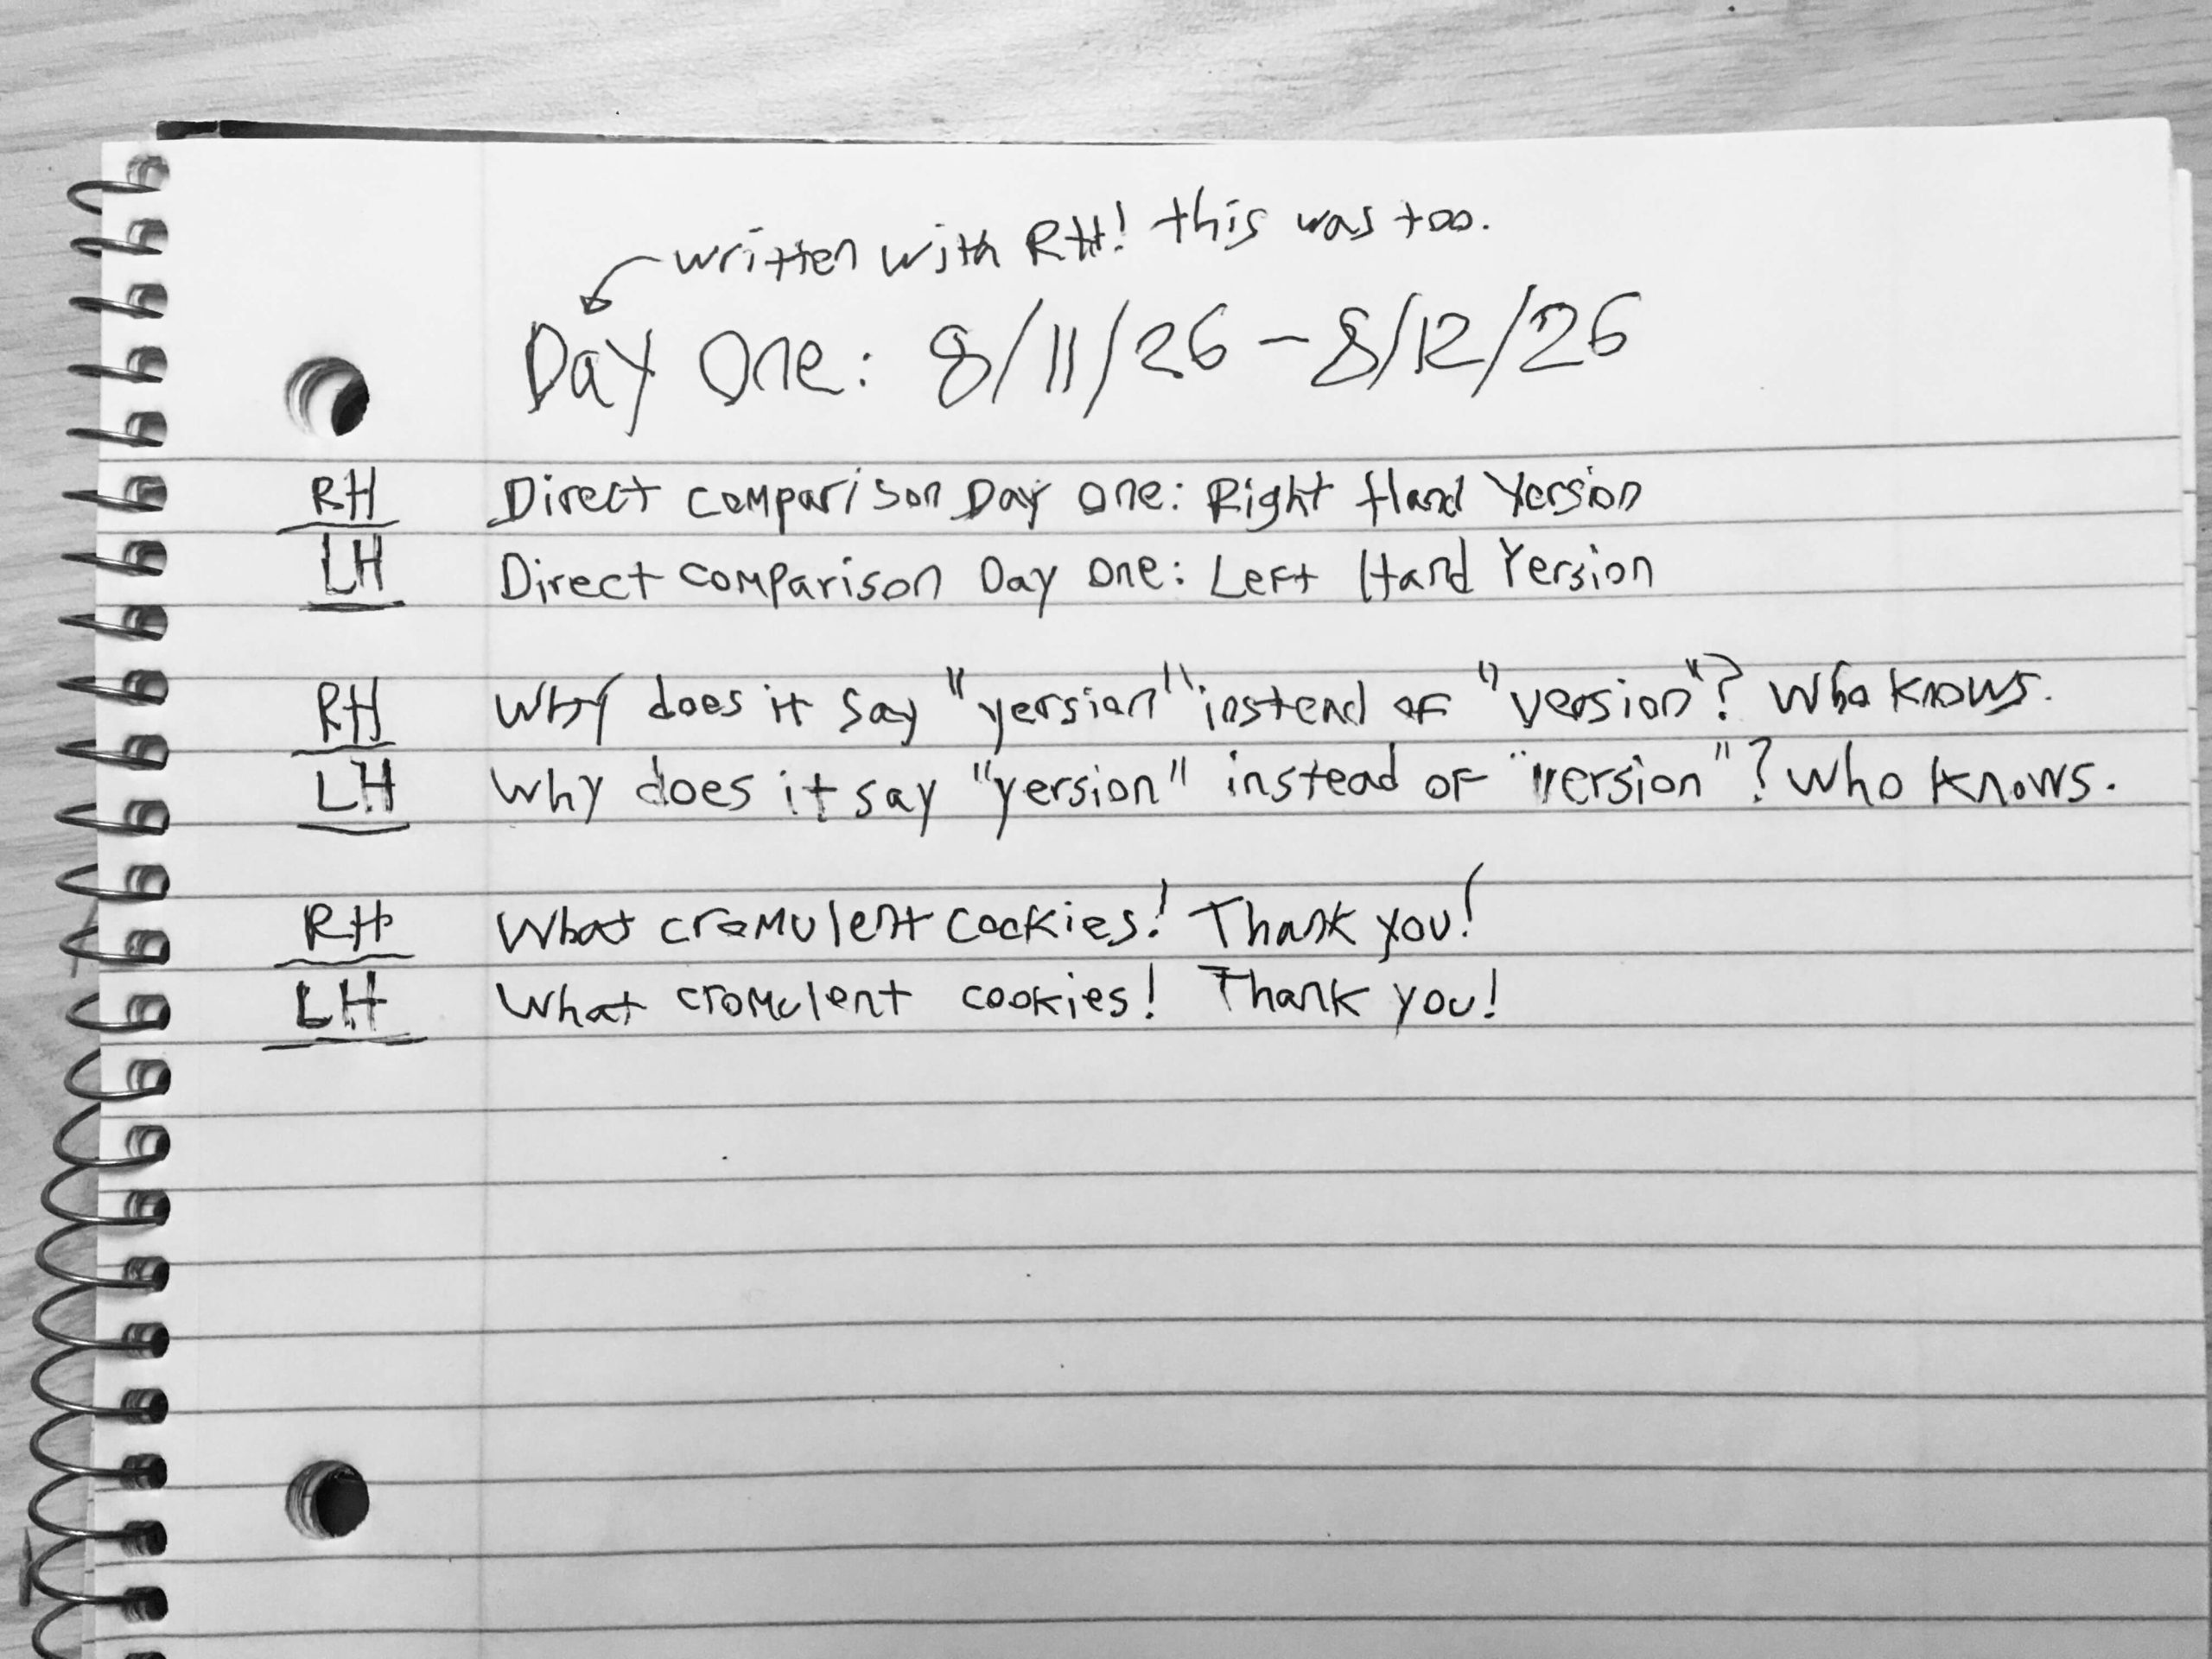
    To close off this week’s report, here’s a photo of Day One of my latest Mystery Project. I won’t say what it is yet, but the answer could be revealed in a future blog post. This is another one of my long-term endeavors that are tied to International Offshore 2027 (or so we believe, for now).

    Well, that’s going to be it for this update. Good luck figuring out what the hell is being represented by the above photo!

  • Wednesday Update: New 3D Modeling Project & Flames of Rebellion Progress

    Wednesday Update: New 3D Modeling Project & Flames of Rebellion Progress

    It’s been a little while since the last update on this site, but then again, I’ve been quite preoccupied with various projects ever since the downfall of the Ashryver Models situation. (That’s right: the Ashryver V1 painting classifier and everything related to it has now been destroyed, and no longer works. This is the result of a full-scale pivot to more reliable, worthwile, and engaging projects). I’m now mainly focusing on the final main book in the Flames of Rebellion Series, and a Blender 3D modeling project for a BeamNG.drive mod.

    In this update, it’s time to take a look at what’s been going on lately. I’ll also provide some rough estimates and plans for the Flames of Rebellion series, and when the next couple of books might be coming out.

    Blender 3D Modeling: the Soluna Project

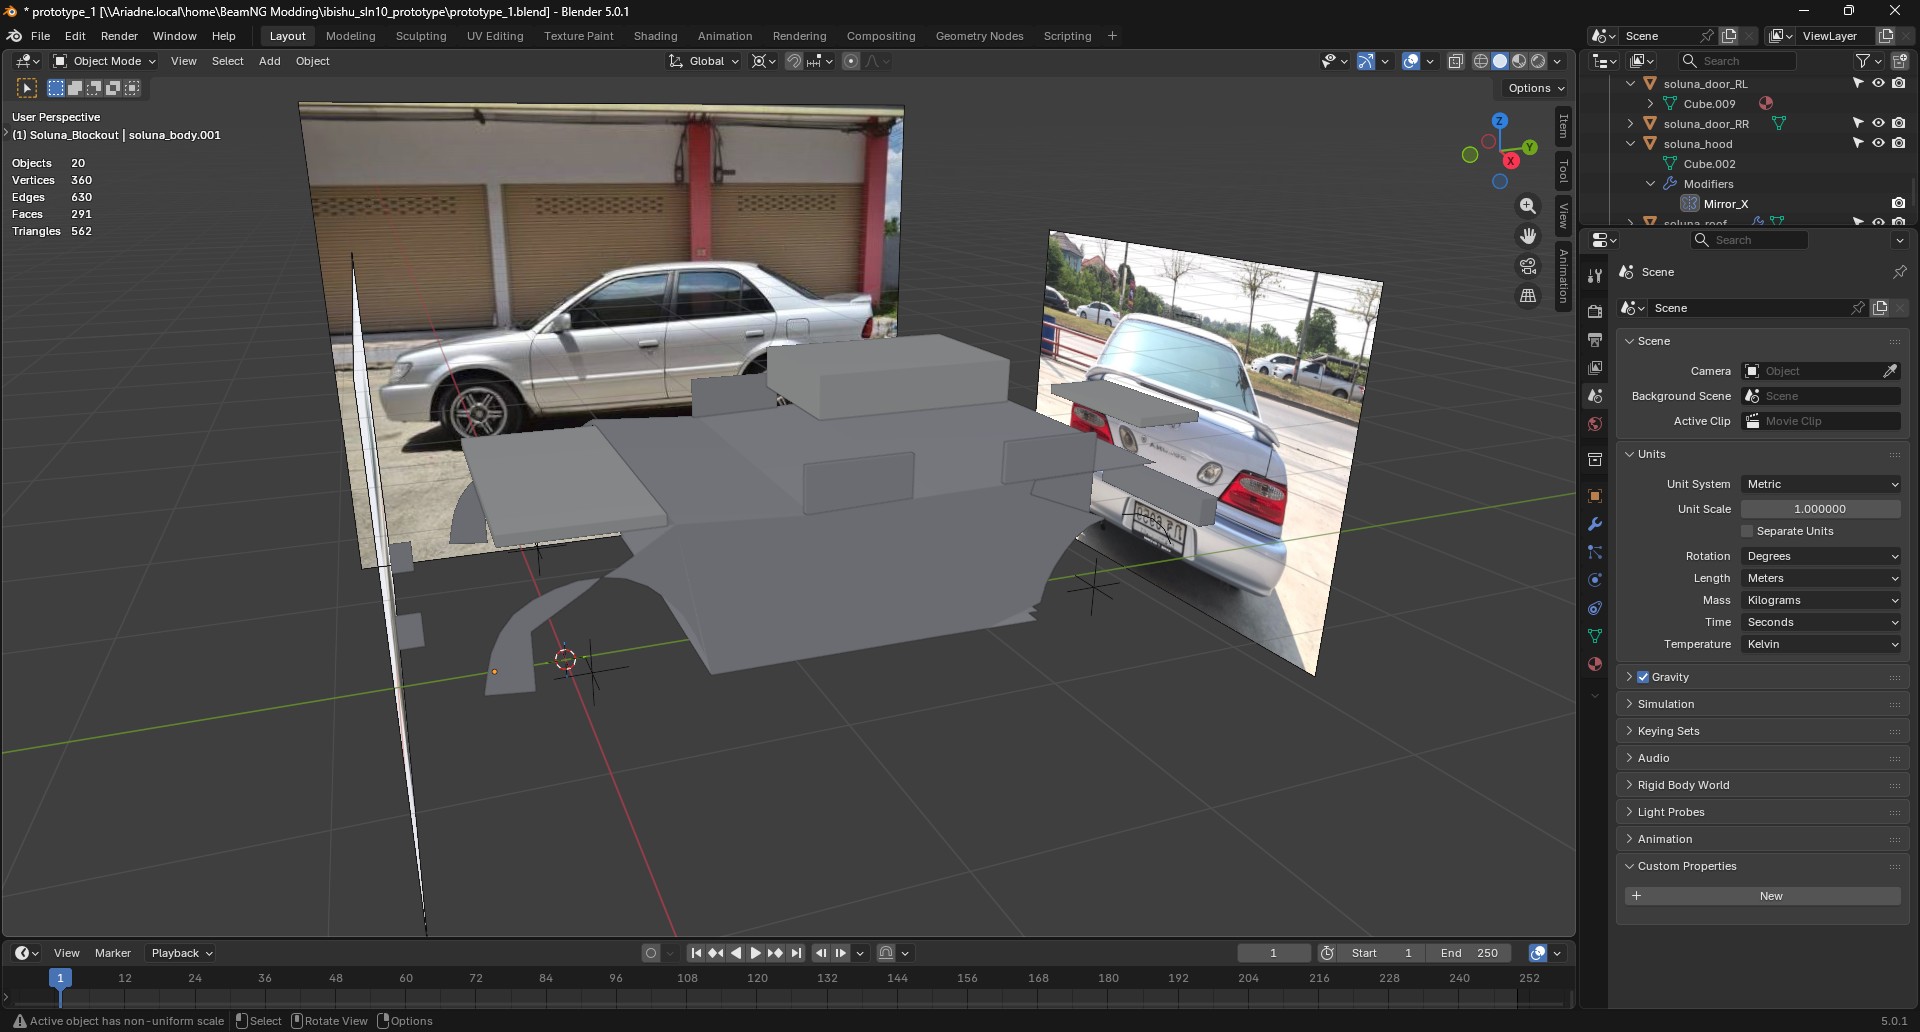
    My current progress in Blender. I’ve increased the width of the vehicle’s body as it seemed much too narrow before, but at the same time, I may have gone too far.

    This is my latest (and primary) undertaking. I started working on this 3D modeling project about three weeks ago, and it was inspired by the lack of any AL50 Toyota Soluna (1998-2002) mods on the BeamNG.drive community. This is because it’s not a very well-known vehicle; with this project, I intend to fill that gap.

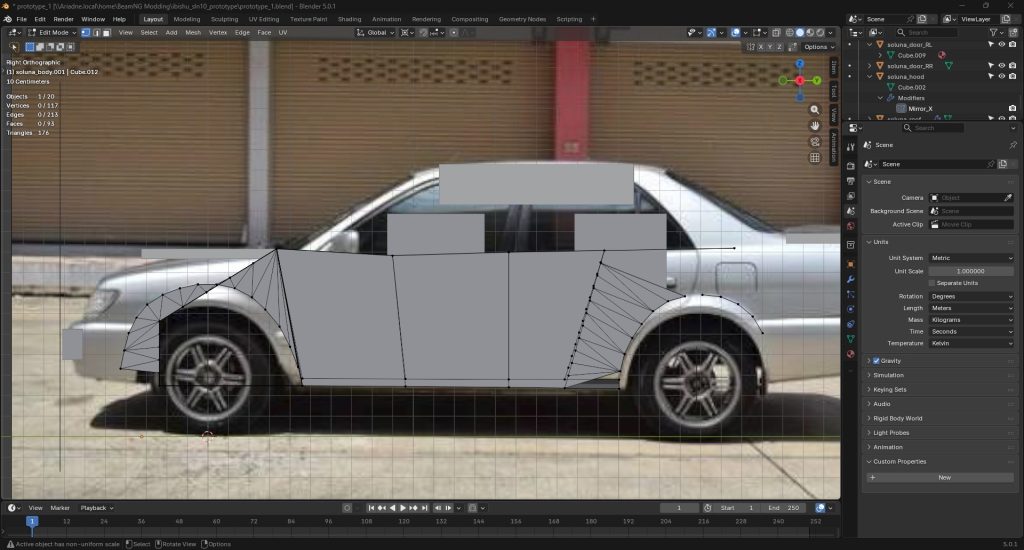
    My first step in this project will obviously be to get a basic 3D model. This is proving to be a very challenging and time-consuming process; however, I have completed the body outline, all four wheel arches, and now starting on shaping the hood after three weeks. My current estimate is that it’ll take another few months to get this model done if I continue working at this pace; December or January of next year is a good estimate.

    After that, I’ll need to move into the nodes & beams phase of the modeling process. This involves using the 3D model as a framework and adding the BeamNG core components around it, including the nodes, which are like the vertices in a complex chemical structure, and the beams, which connect the nodes together. There could easily be thousands of nodes and beams for a fully beamed (or JBEAMED) vehicle, so this might take another 4-5 months.

    The final phase will likely involve doing some UV mapping, sorting out the myriad bugs that I’m sure will emerge, and getting all the configurations set up. And this will likely just be for the basic Soluna copy with the standard interior and openable doors. This particular version of the project will be released on third-party sites like Modland only, since BeamNG prohibits the distribution of copyrighted vehicles on their own site.

    However, I have a workaround for that. Once I’m satisfied with the base Soluna mod, my intention is to go back and creatively modify the vehicle so that it fits with BeamNG’s in-game Ibishu brand. This should work well, since Ibishu is BeamNG’s equivalent of Toyota; from there, I can subtly change the taillight design and the gauge cluster, for example, so that I can market a lore-friendly Soluna version on the BeamNG repository. (This whole mod will obviously be free, of course. I don’t believe in charging money for mods of any kind, no matter how many apps are supported by the game’s ‘CarPlay’ screen, or how many ‘hours per day’ I spend on the mod).

    Right now, all of this is sounding rather daunting as I’m only on the 3D modeling stage. Honestly, though, I’ve made a whole lot more progress than I’ve expected in the psat few weeks–and certainly since the first blog post I wrote about this modeling project, when the Soluna was still a shapeless box. I’ve encountered numerous troubles along the way, most notably with the wheel arches. For some reason the geometry got destroyed as I was trying to fill in points surrounding the rear arch; the fan got all tangled up and cluttered. I had to completely reset the rear arch and start over; fortunately, that fixed the problem after a couple days’ of work. I can only hope that I’ll be able to push through similar challenges as this gets more complex, becuase I know these issues will be coming.

    Below is another view of the current state of the Soluna project; I’ve just diagnosed an issue with the main soluna_body being far too narrow. Hopefully I haven’t inadvertently broken anything else.

    Flames of Rebellion Book 4

    As you may recall, the previous book in the Flames of Rebellion series (book 3.5) was published just back in April. That was Reckoning of the Past, a medium-length in-between novel detailing a side plot in the series. Now, I’m moving hard on Book 4 in the Flames of Rebellion series, currently called The Conquest of Peace. This will likely be a longer book, in the 410-420 page range, as this is the series finale and needs to tie up all the loose plot ends. Right now, I’m sitting at about 30,000 words and 135 pages, putting me at about 35% through the book. I can’t release a target month right now, as it’s still a bit too early for that, but I’m hoping it can be published around winter 2026 (December 2026 to maybe January 2027).

    After that, only one book will be left: the prequel. This will be book 0.5, examining what came before the First World and the Thirteen Worlds and everything taking place in the main series. Book 0.5 will be set in around GY 23, which is the World Zero equivalent of about seven hundred years prior to the main novels. It will focus on the ancient Cymantian Empire, explaining the political conflicts and conquests that split apart the empire and led to the turbulent formation of the First World. While Jonathan, Lily, Phoenix, Ember, and Grace will not be a part of the prequel (at least, not right now), there will be many other new and intriguing characters, plus old villains like Aaron Fisker and the Cymantus itself. I’m still figuring out the best way to introduce this ancient world without making readers feel too confused.

    My current end-of-series target is summer 2027, or about a year from now. If possible, I’d like to get the Flames of Rebellion universe closed out before the next International-Offshore Excursion, which is still tentatively set for summer 2027 as well. This will provide clean break for the next project, which might be something completely different, and much more grounded in reality. Stay tuned for that.


    Well, with that, I think that’s everything for this site update. I’ll be updating the Flames of Rebellion page soon with some more details about Book 4, and expect more updates as the Blender 3D modeling project progresses. Hopefully I won’t destroy any more geometry!